User Guide
(Written by Nicholas Canete)
Thank you for choosing Common Cents! This is your convenient at-hand expense-tracking tool, meant for anyone who runs a small-scale business. With just a few commands, Common Cents will keep track, categorise and calculate your income and expenditure for you! You can even keep your expenses in multiple accounts for seamless organisation. Amalgamating the features of a Command Line Interface (CLI) with a Graphical User Interface (GUI), Common Cents is meant to be functional, intuitive and faster than most traditional GUI expense-trackers out there!
- 1. Quick Start
- 2. How to identify notations
- 3. User Interface Overview
- 4. Components
-
5. Features
- 5.1 App-Level Commands
-
5.2 Entry-Level Commands
- 5.2.1 Adding an entry:
add - 5.2.2 Deleting an entry:
delete - 5.2.3 Editing an entry:
edit - 5.2.4 Locating entries by description:
find - 5.2.5 Listing all entries:
list - 5.2.6 Clearing all expenses or revenue:
clear - 5.2.7 Calculating net profits based on expenses and revenues:
profit - 5.2.8 Undoing Entry-level commands:
undo
- 5.2.1 Adding an entry:
- 5.3 Account-level Commands
- 6. Frequently Asked Questions (FAQ)
- 7. Command Summary
- 8. Acknowledgement
This User Guide will show you how to navigate the User Interface (UI), give you step-by-step instructions on using commands, tips and tricks on how to maximise your experience with Common Cents and clarify most doubts that you may have.
The Common Cents interface and commands consist of a few levels: App level, Account level and Entry level.
-
Applevel commands deal with interactions with the app itself.
-
Accountlevel commands deal with managing the different accounts in the app.
-
Entrylevel commands deal with managing the entries which are either expenses or revenues in an account.
1. Quick Start
(Written by Jordan Yoong)
Below are steps to help you set up and start your Common Cents experience!
1. Ensure you have Java 11 or above installed in your Computer.
2. Download the latest commoncents.jar.
3. Copy the file to the folder you want to use as the home folder for Common Cents.
4. Double-click the file to start the app. You should see the GUI similar to the one below in a few seconds (Figure 1-1).
Note how the app contains some sample expenses and revenues if you have not used the app before.
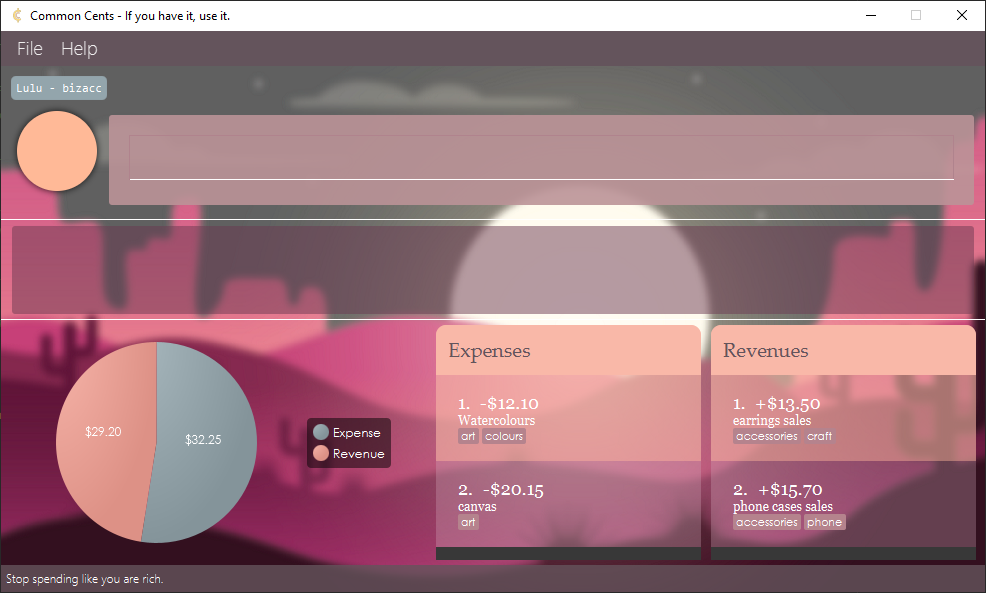
Figure 1-1: Default GUI
5. Type the command in the command box and press Enter to execute it. e.g. typing help and pressing Enter will open the help window.
Some example commands you can try:
-
add c/expense d/buy lunch a/5.20 t/food: Adds an expense named “buy lunch” to the expense list. -
delete 1 c/expense: Deletes the 1st entry in the expense list. -
exit: Exits the app.
6. Refer to the Features below for details of each command.
2. How to identify notations
(Written by Lim Zi Yang)
These blocks are a few examples of notations that will be used in this document. Each block and icon has a different meaning so do look out for them under our features.
![]() Note:
Note:
Important notes to read regarding the feature.
![]() Tip:
Tip:
Ways to better your experience with Common Cents.
![]() Example:
Example:
An example, or multiple examples to follow.
![]() Warning:
Warning:
Important cautions that needs to be known before using the feature.
3. User Interface Overview
(Written by Le Hue Man)
As you can see, Figure 3-1 below shows the default user interface (UI) of Common Cents with its components.
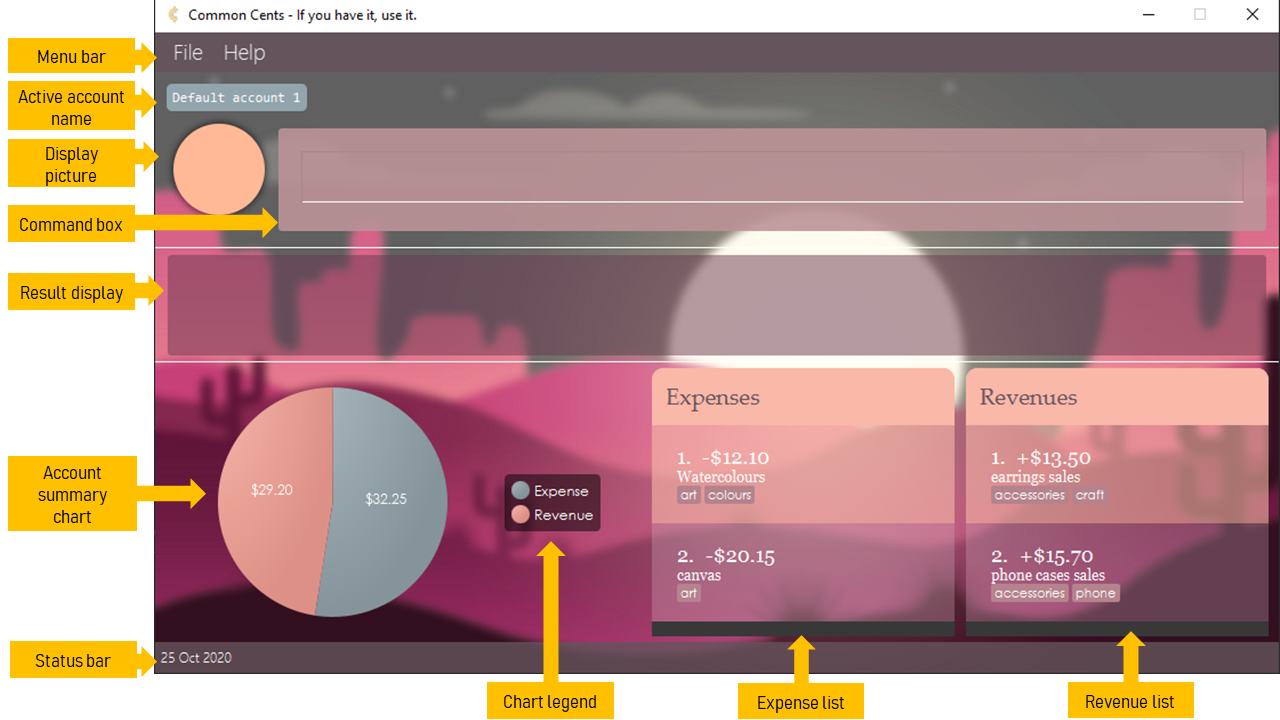
Figure 3-1: Default user interface of Common Cents
You can find the description for each UI component shown in the table below.
| UI component | Description |
|---|---|
| Menu bar | Displays the menu bar of Common Cents. You can use this to access the User Guide or exit the application. |
| Active account name | Displays the account you are currently on. |
| Display picture | Displays the default display picture of the application. |
| Command box | Displays a text field for you to type the commands. |
| Result display | Displays the result of your command. If the command is invalid, an error message will be displayed to prompt and guide you to input valid correct command. |
| Account summary chart | Displays the total expenses and revenues in your current account in a pie chart. |
| Chart legend | Displays the legend for the account summary chart. |
| Status bar | Displays the current date. |
| Expense list | Displays all the expenses in your current account in a panel. |
| Revenue list | Displays all the revenues in your current account in a panel. |
4. Components
(Written by Nicholas Canete)
This section describes the various components that comprises Common Cents, mainly Account and Entries. If you are new to Common Cents, do not fret as this section will guide you step by step in understanding the components available! This will better your experience with Common Cents and your usage of features!
4.1 Accounts
(Written by Nicholas Canete)
Accounts in Common Cents are key features that help you better manage, categorise, and organise your finances better.
In Common Cents, each account has a unique name, and a unique list of expenses and revenues.
You can make as many accounts as you’d like in order to help you better categorise and organise your finances better!
When you first launch Common Cents, a General Account is made for you by default, which you may use on top of other accounts. You may also make new accounts and switch between them and give them their very own set of expenses and revenues.
4.1.1 Name
As mentioned in the previous section, you are able to make new accounts on top of the General Account. Every account MUST have a unique name and duplicate names are not supported, so that you are able to distinguish and identify your accounts better.
4.1.2 Expense List
Each account will have an Expense list - that is, a list of transactions that involve expenditure on your end (i.e. net outflow of money). In general, expenses keyed into Common Cents have a compulsory Description and Amount, as well as optional Tags. In the app user interface, each expense amount will be displayed as a negative value and all the expenses will be displayed as a scrollable list.
4.1.3 Revenue List
Each account will also have a Revenue list - that is, a list of transactions that involve profit from your end (i.e. net inflow. of money). Like expenses, revenues keyed into Common Cents have a compulsory Description and Amount, as well as optional Tags. In the app user interface, each revenue amount will be displayed as a positive value and all the revenues will be displayed as a scrollable list, right beside the expenses list.
4.2 Entries
(Written by Nicholas Canete)
‘Entry’ (or ‘Entries’) is the term used to describe either Expense or Revenue. Each entry input into Common Cents would have compulsory fields - Description, Amount - and optional Tags.
4.2.1 Category
Category is the field that specifies the type of Entry input that Common Cents receives from you. It is used in commands
to differentiate entries between Expense and Revenue. You can either specify the category as an expense or a revenue,
or e or r for short and these are not case-sensitive. This documentation uses expense or revenue as examples in
the Features below.
4.2.2 Description
Description refers to the textual information that is associated with the Entry that Common Cents receives from you, in order to provide more information about the Entry.
4.2.3 Amount
Amount is the numeric value associated with the Entry that Common Cents receives from you. All amounts, for both expenses and revenues must be given as a positive value.
4.2.4 Tags
Tags refer to short textual prompts attached to an Entry, with the purpose of giving extra information and identity for your Entries in Common Cents.
5. Features
(Written by Jordan Yoong)
Here are some general notes about the commands in Common Cents.
![]() About the command format:
About the command format:
-
Words in UPPERCASE are the parameters to be supplied by the user.
e.g. inadd c/CATEGORY...,CATEGORYis a parameter which can be used asadd c/REVENUE... -
Items in square brackets are optional.
e.g....a/AMOUNT [t/TAG]can be used as...a/50.10 t/Suppliesor as...a/50.10. -
Parameters preceded by a prefix can be in any order.
e.g. if the command specifiesc/CATEGORY d/DESCRIPTION...,d/DESCRIPTION c/CATEGORY...is also acceptable. -
Numeric parameters (e.g.
INDEX) must be in the correct order.
e.g. if the command specifiesINDEX c/CATEGORY, onlyINDEX c/CATEGORYis acceptable andc/CATEGORY INDEXis invalid. -
Commands with no prefix parameters (e.g.
clear,profit,listacc) can take in extra words after the command word without affecting its execution.
e.g. the commandprofit abcworks the same asprofitand is considered valid.
The commands are separated into three categories: App-Level commands, Entry-Level commands and Account-Level Commands.
Each level interacts with Common Cents differently to maximise your experience. More details about each level are found in its own section below.
5.1 App-Level Commands
App-Level commands deals with interactions with the app, Common Cents, itself.
5.1.1 Viewing help : help
(Written by Jordan Yoong)
You can use this command when you are at a lost or want to view an overview of how to use the application.
This command will return a message explaining how to access the help page (Figure 5.1-1).
You can click on the Copy URL button to copy the link to clipboard and paste it in your web browser.
Format: help
![]() Example:
Example:
-
help: Returns help prompt (Figure 5.1-1)

Figure 5.1-1: Help message
5.1.2 Exiting the program : exit
(Written by Jordan Yoong)
You can use this command when you are done with what you need to do and want to close the application.
Format: exit
![]() Example:
Example:
-
exit: Returns exit message then quits the program in 1.5 seconds (Figure 5.1-2)
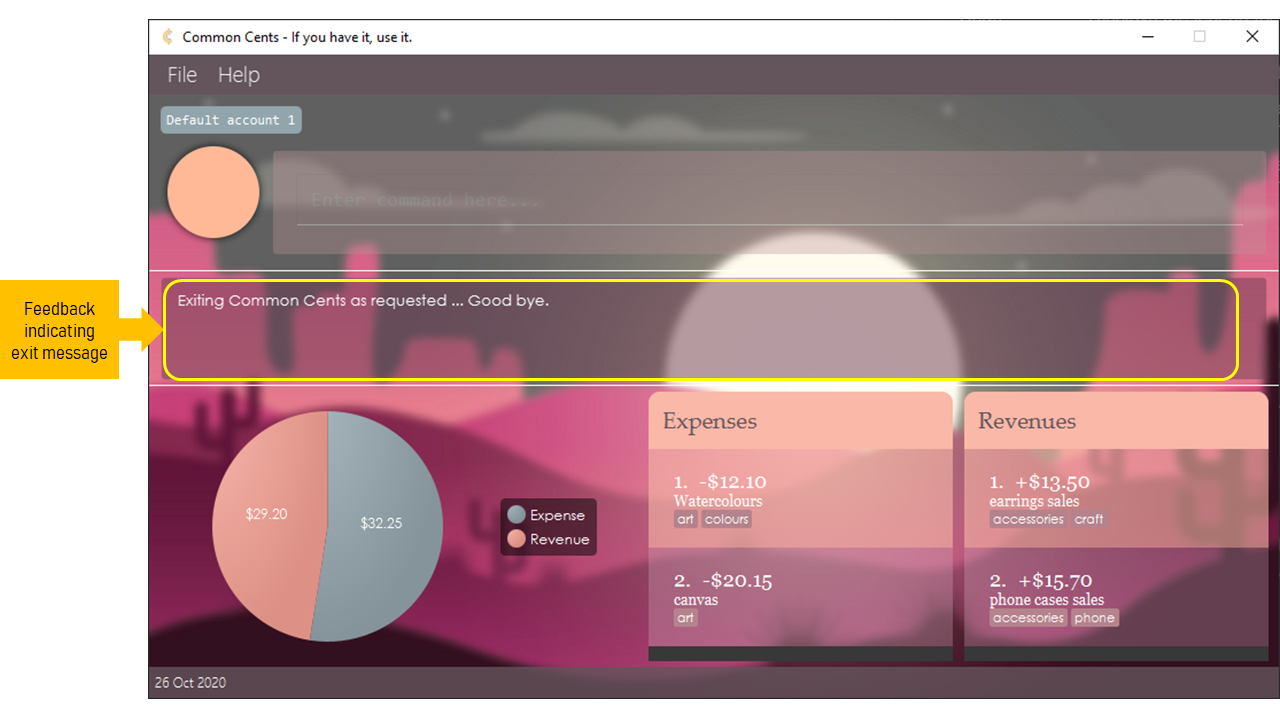
Figure 5.1-2: Exit message appears in Result display
5.2 Entry-Level Commands
Entry-Level commands involve managing the entries which are either expenses or revenues in an account.
5.2.1 Adding an entry: add
(Written by Jordan Yoong)
You can use this command when you want to add an entry (expense/revenue) to the tracker.
Format: add c/CATEGORY d/DESCRIPTION a/AMOUNT [t/TAG]
![]() Example:
Example:
-
add c/expense d/buying supplies a/10.10 t/blogshop t/eCommerce(Figure 5.2-1) add c/revenue d/sale of clothes a/200 t/blogshop t/eCommerce
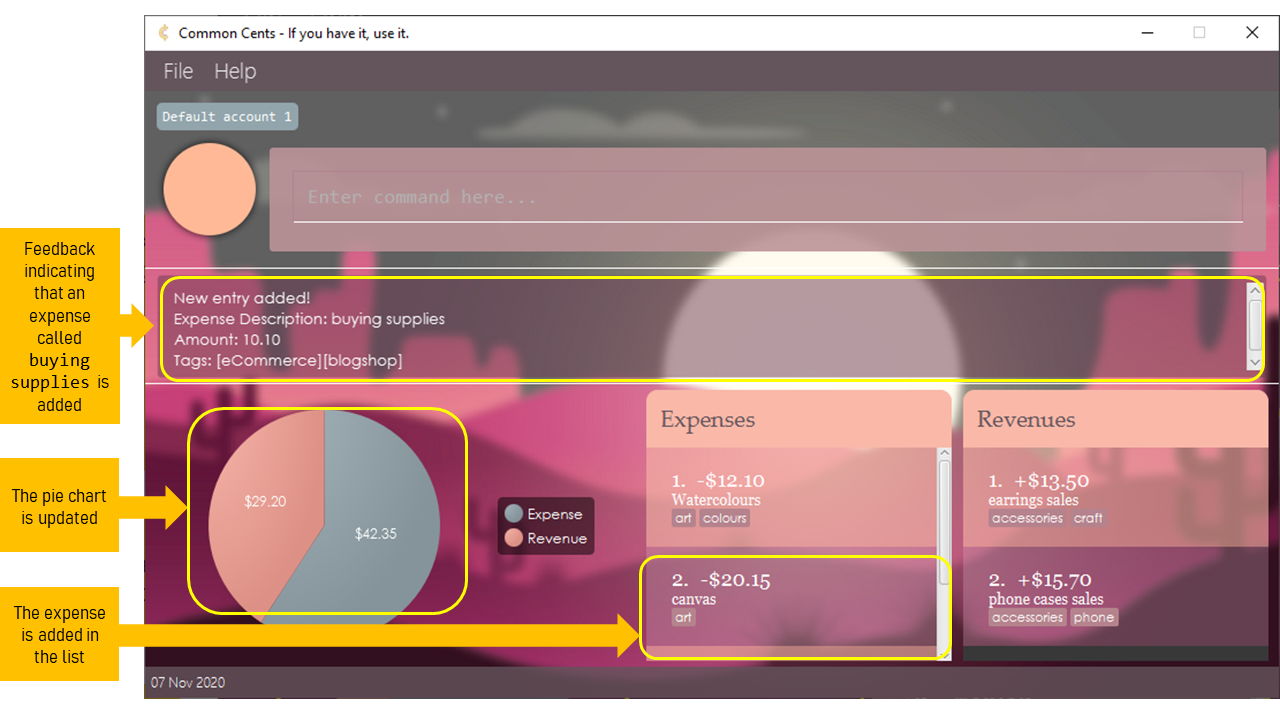
Figure 5.2-1: A new expense called "buying supplies" is added
![]() Note:
Note:
- Adds an entry to either category.
- The category refers to the classification of the entry in the entry lists.
- The category must be either ‘expense’ or ‘revenue’.
- Each tag can only be 1 word.
- If multiple tags are required, do input multiple t/ prefixes.
- Each tag in entry only appears once even if added multiple times.
![]() Tip:
Tip:
- Input expense/revenue information can be in any order
5.2.2 Deleting an entry: delete
(Written by Jordan Yoong)
You can use this command to remove an entry (expense/revenue) from the tracker when you do not want to keep track of it anymore.
Format: delete INDEX c/CATEGORY
![]() Example:
Example:
-
delete 1 c/expense: Deletes first entry in expense category -
delete 2 c/revenue: Deletes second entry in the revenue category (Figure 5.2-2)
![]() Tip:
Tip:
- It is possible for you to use the
findfunction thendelete.
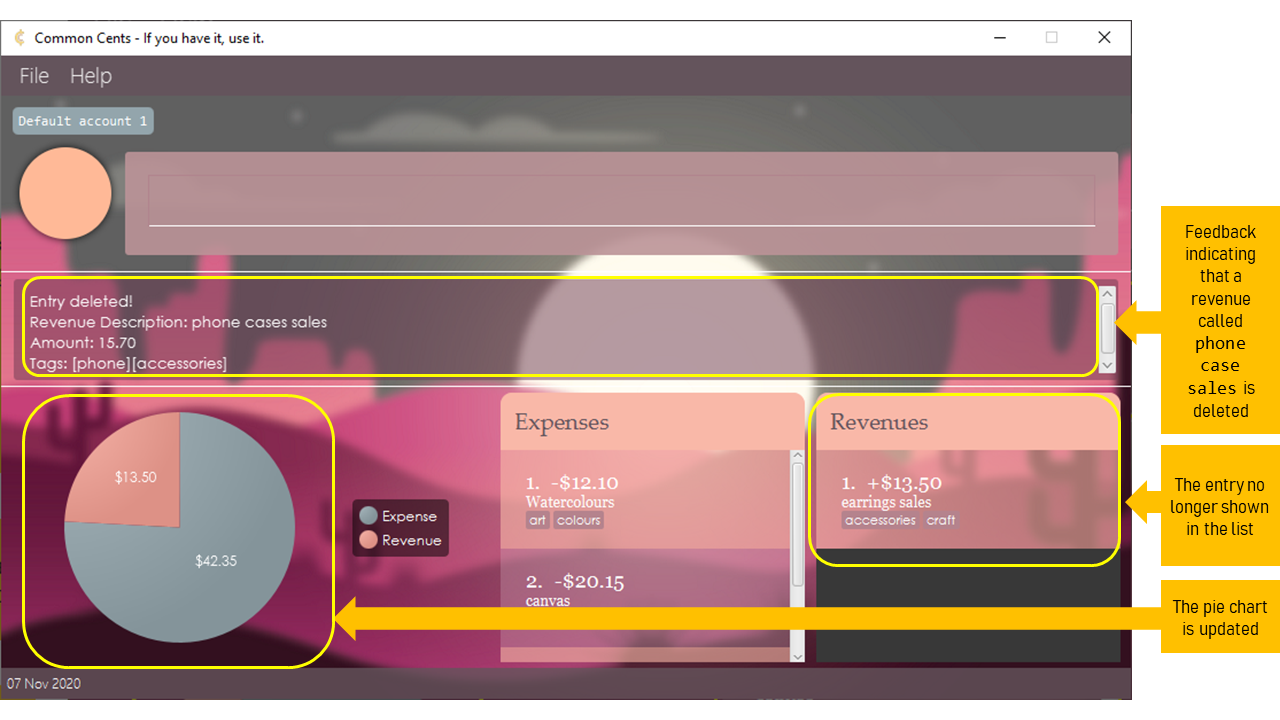
Figure 5.2-2: The revenue at index 2 is deleted
![]() Note:
Note:
- Deletes the entry at the specified INDEX.
- The index refers to the index number shown in the displayed entry lists.
- The index must be a positive integer (e.g. 1, 2, 3), and must be within the range of the number of entries (e.g. if there are 10 entries, the INDEX given cannot be > 10).
5.2.3 Editing an entry: edit
(Written by Jordan Yoong)
You can use this to make edits to any existing entries in the tracker when the details of the entry are wrongly keyed.
Format:
edit 1 c/CATEGORY d/DESCRIPTION a/AMOUNT t/TAGedit 2 c/CATEGORY d/DESCRIPTIONedit 3 c/CATEGORY a/AMOUNT
![]() Example:
Example:
-
edit 2 c/expense d/buy McSpicy a/8.60: Changes the name and the amount of entry 2 (Figure 5.2-3) tobuy McSpicyand$8.60respectively (Figure 5.2-4) -
edit 2 c/revenue d/sell McNuggets: Changes the name of entry 2 tosell McNuggets -
edit 2 c/expense a/5.50: Changes the amount of entry 2 to$5.50
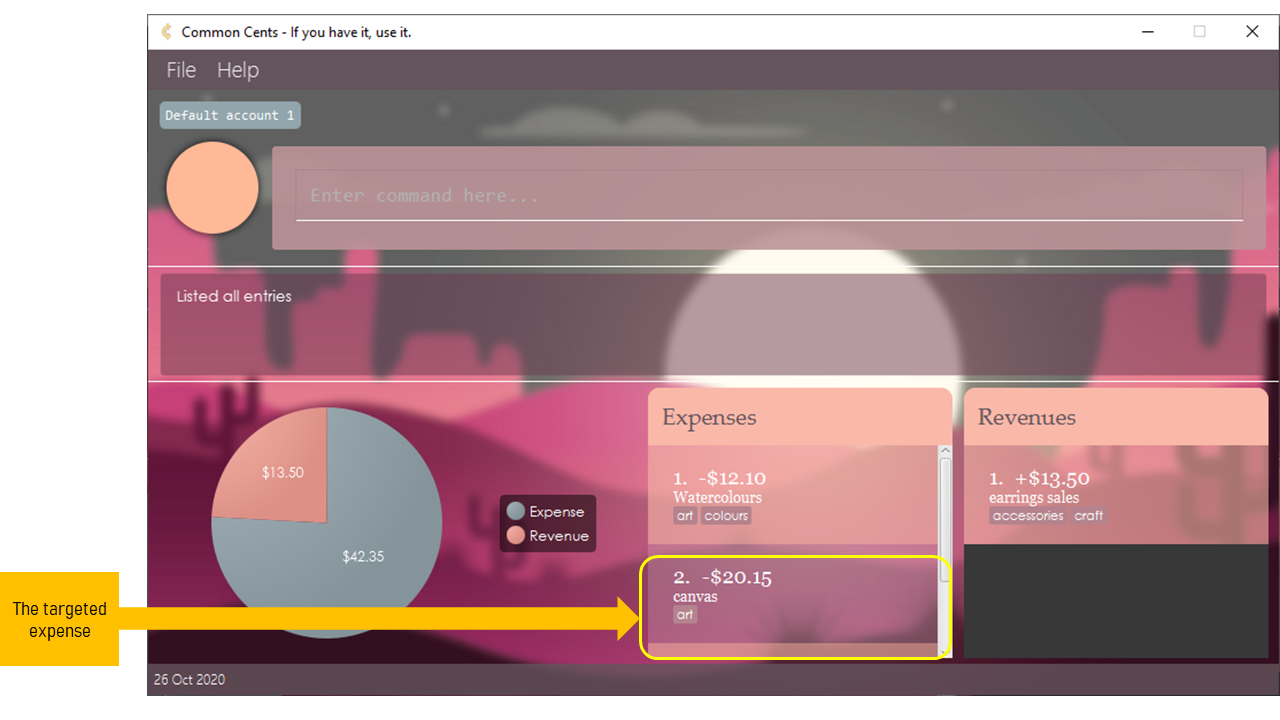
Figure 5.2-3: The targeted expense at index 2 before editing
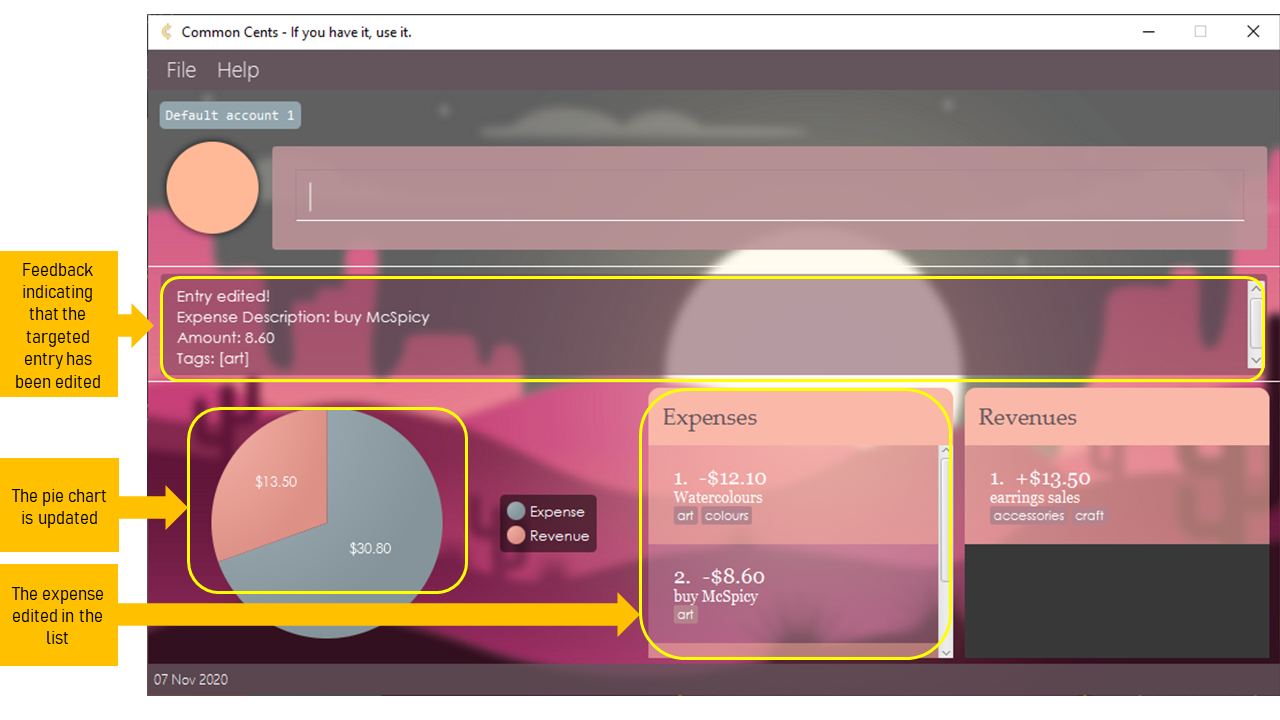
Figure 5.2-4: The targeted expense at index 2 after editing
![]() Note:
Note:
- Edits an entry that matches the entry name and changes the parameters of an entry depending on which are specified.
- The tags d/ and a/ have to be used to indicate which field specifies DESCRIPTION and which field specifies AMOUNT.
- When editing an entry’s tags, the existing tags of the entry will be removed i.e adding of tags is not cumulative.
- The index must be a positive integer 1, 2, 3, and must be within the range of the number of entries
(e.g. if there are 10 entries, the
INDEXgiven cannot be > 10). - It is possible for you to use the
findfunction thenedit. - The
editcommand still executes if you use the same description, amount or tags as the existing entry in the parameters.
![]() Warning:
Warning:
- When you use the ‘edit’ command after the ‘find’ command, if the edited description does not match the predicate, it disappears from the list!
5.2.4 Locating entries by description: find
(Written by Le Hue Man)
You can use this command to list expenses and/or revenues that have the given keyword(s) in their descriptions. This is
useful when you want to find some particular entries to delete or edit.
If there is no expense or revenue found, the respective list will be empty.
Format: find [c/CATEGORY] k/KEYWORDS
![]() Example:
Example:
-
find c/expense k/watercolours canvas: Finds all expenses with keywordswatercoloursand/orcanvasin their description -
find c/revenue k/phone: Finds all revenues with keywordphonein their description -
find k/canvas earrings: Finds all expenses and revenues with keywordscanvasand/orearringsin their description (Figure 5.2-5)
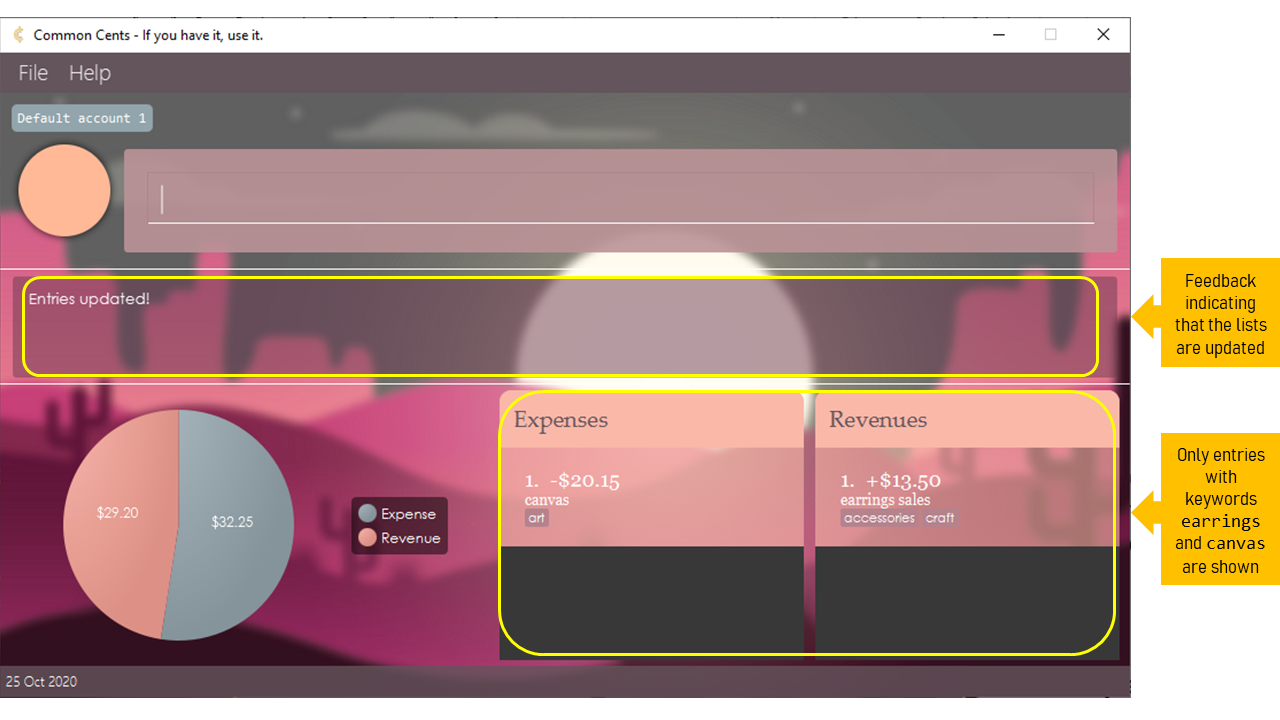
Figure 5.2-5: Find command successfully executed
![]() Note:
Note:
- The search is case-insensitive. e.g.
grocerywill matchgroceryandGrocery. - Only the entry’s description is searched.
- The search does not match partial words. e.g.
foodwill matchfoodandfast foodbut notfastfood. - Entries matching at least one keyword will be returned (i.e. OR search). e.g.
Foodwill returnHawker food,Restaurant Food. - The
c/CATEGORYis optional.
![]() Tip: When there are a lot of entries, and you want to delete something,
you can use
Tip: When there are a lot of entries, and you want to delete something,
you can use find to search for it in the list and use delete INDEX to remove it from the updated
list, with the updated INDEX.
5.2.5 Listing all entries: list
(Written by Jordan Yoong)
You can use this command to list all entries in the current account when you want to have an overview of your account.
Format: list
![]() Example:
Example:
-
list: Returns the latest list of all entries
5.2.6 Clearing all expenses or revenue: clear
(Written by Jordan Yoong)
You can use this command to clear all entries from a particular category when you do not need to track them anymore.
Format: clear [c/CATEGORY]
![]() Example:
Example:
-
clear: Clears all entries visible in both the expense and revenue lists -
clear c/expense: Clears all entries visible in expense list (Figure 5.2-6) -
clear c/revenue: Clears all entries visible in revenue list
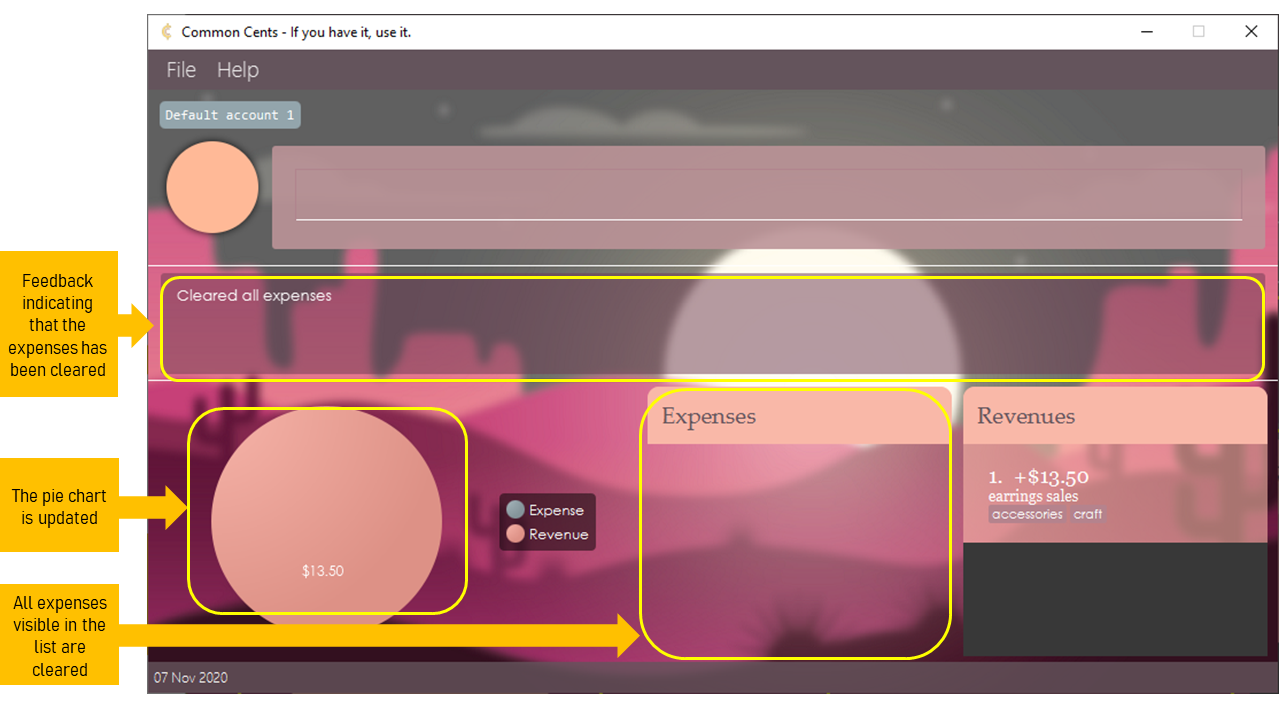
Figure 5.2-6: The expenses in the account are cleared
![]() Note:
Note:
- The
clearcommand will clear all entries in the stipulated category. If you would like to delete selected entries, use thedeletecommand instead. - It is possible for you to use the
findfunction thenclear.
5.2.7 Calculating net profits based on expenses and revenues: profit
(Written by Cheok Su Anne)
If you wish to calculate the profits you have currently, you may use this command to do so.
Format: profit
![]() Example:
Example:
-
profit: Returns the profits (Figure 5.2-7) by taking the difference between the expenses and revenues

Figure 5.2-7: Profit command successfully executed
![]() Note:
Note:
The profit function will show deficits as a negative number if the total expenses is greater than the total revenue.
5.2.8 Undoing Entry-level commands: undo
(Written by Lim Zi Yang)
You can use this command to return to the state of the entry prior to the previous command.
Format: undo
![]() Example:
Example:
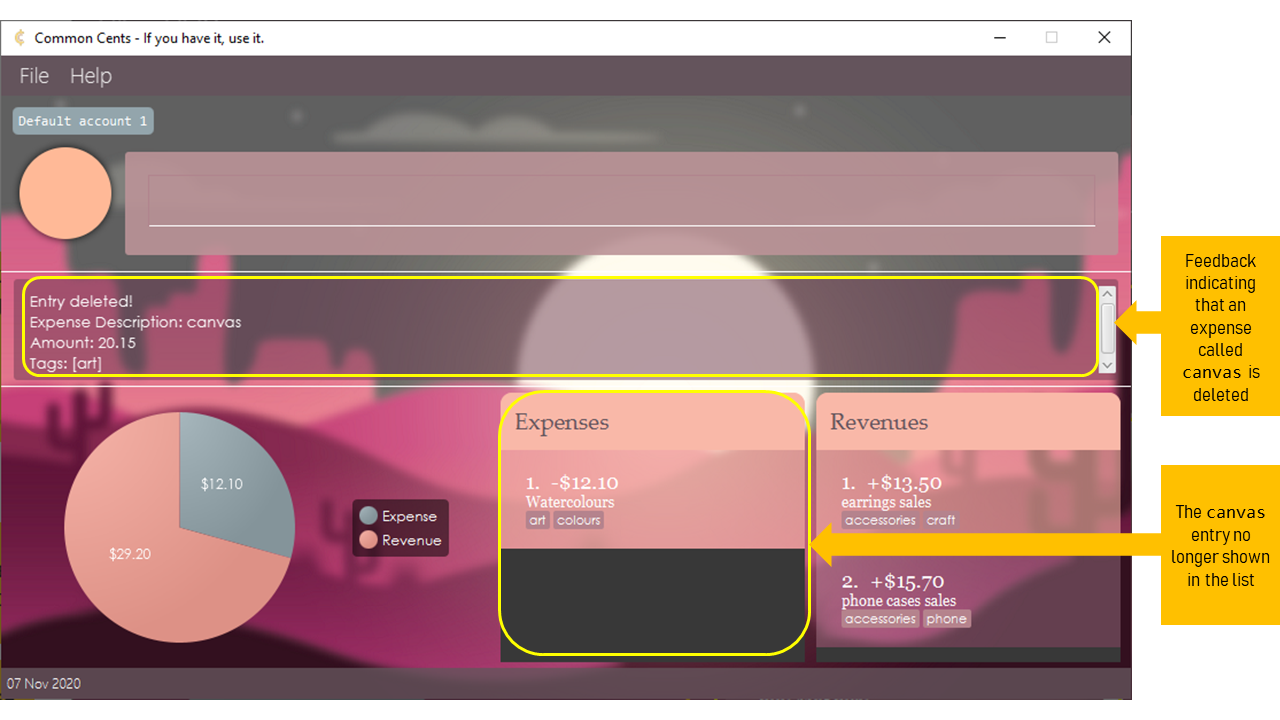
Figure 5.2-8: Before the undo command, an expense was deleted
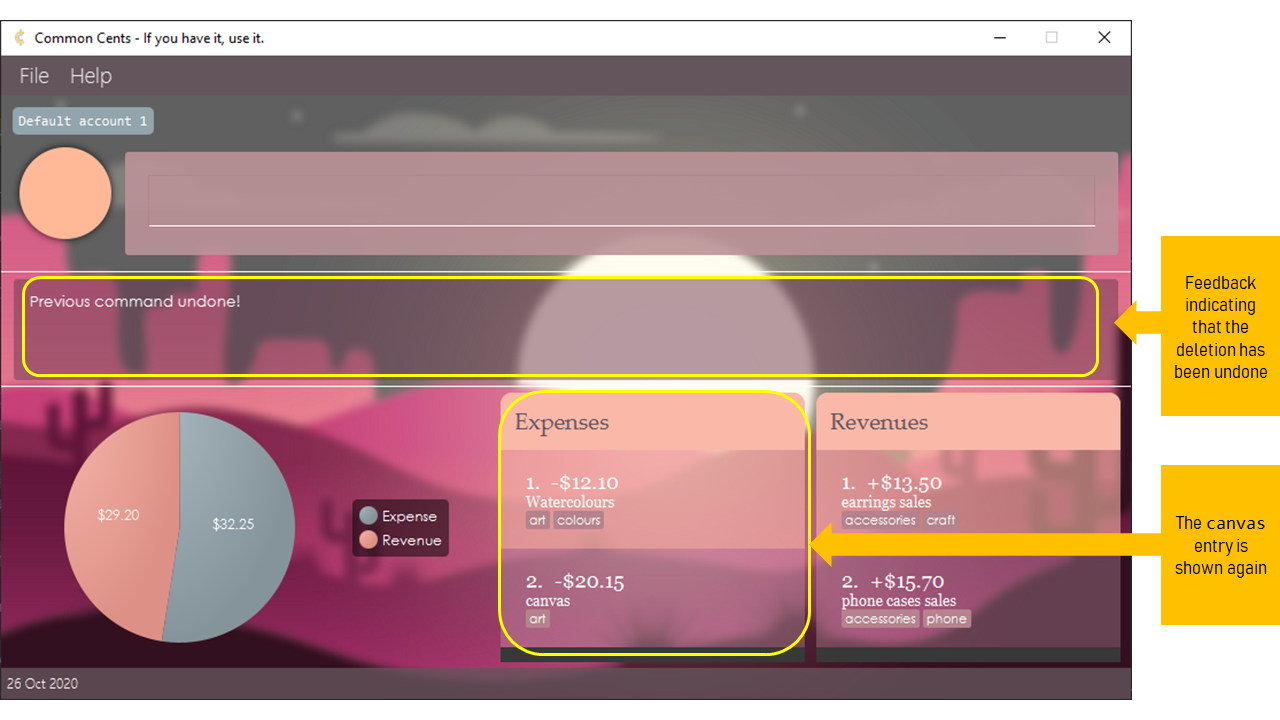
Figure 5.2-9: After the undo command, the deleted expense is added again
![]() Note:
Note:
- Do note that the
undocommand can only undoadd,delete,editandclearcommands at the entry-level. Account-level commands cannot be reverted using theundocommand. - Once you use the
switchacccommand, all the previous states for theundocommand will be lost. This would mean that if you choose to switch back to the account, you cannot undo the previous entry-level commands anymore.
![]() Warning:
Warning:
- There is no
redocommand to revert yourundocommand. Do use theundocommand with caution! - Once you exit the app, all the previous states will be lost. Do confirm your changes to the entries in the account before you exit the app!
5.3 Account-level Commands
Account-Level commands involve managing the different accounts in the app.
5.3.1 Adding new account: newacc
(Written by Lim Zi Yang)
You can create a new account to manage a different set of entries with this command.
Format: newacc n/NAME
![]() Example:
Example:
-
newacc n/My Flower Shop: Adds a new account,My Flower Shop, with no expenses or revenues -
newacc n/$uper $avers: Adds a new account,$uper $avers, with no expenses or revenues (Figure 5.3-1)
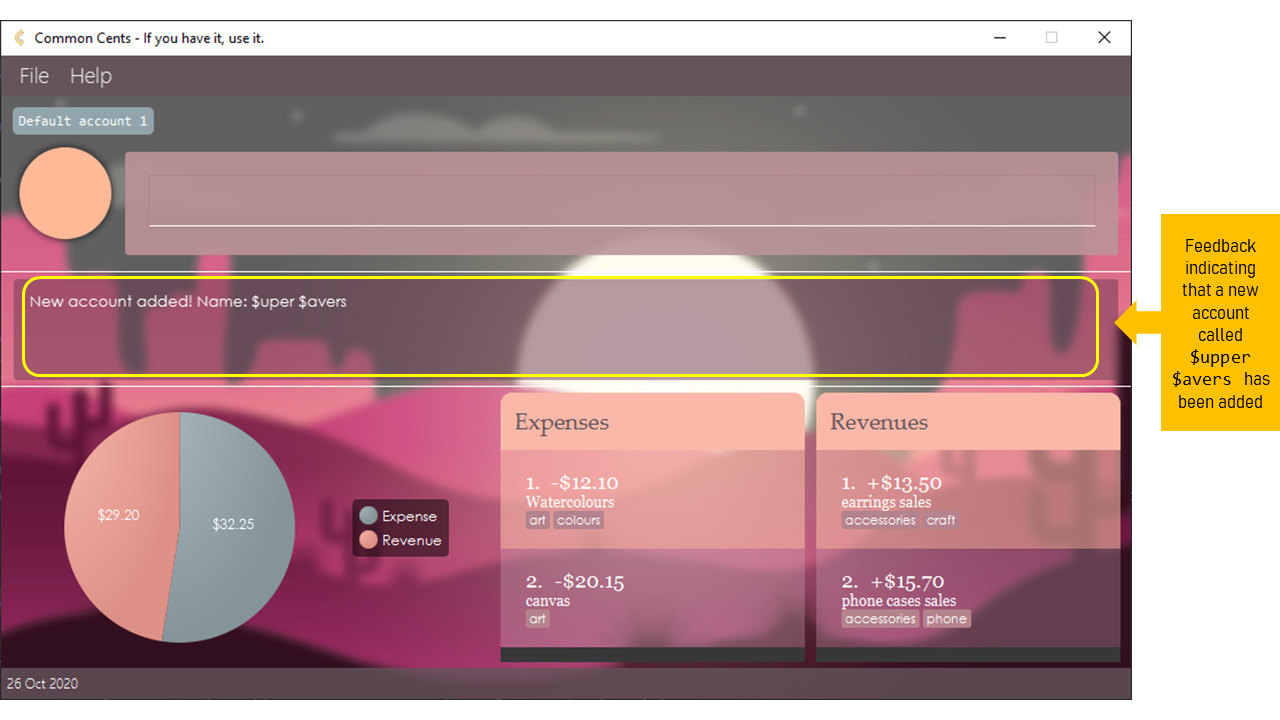
Figure 5.3-1: A new account called $uper $avers is added
![]() Note:
Note:
5.3.2 Deleting an account: deleteacc
(Written by Lim Zi Yang)
You can remove an account by using this command. This command is useful for clearing accounts you are no longer using.
Format: deleteacc INDEX
![]() Example:
Example:
-
deleteacc 3: Deletes third account based on list generated by usinglistacc(Figure 5.3-2)

Figure 5.3-2: An account called My Flower Shop is deleted
![]() Note:
Note:
Do note that Common Cents prevents you from deleting the account if you are currently on that account or if the account is your only account left.
![]() Tip:
Tip:
If you are unsure of the account index, use listacc to check the index!
![]() Warning:
Warning:
Deleting your account means all the data of the entries in the account is lost as well. Also, deleting is an irreversible action and cannot be undone. Do delete your account with caution!
5.3.3 Editing the name of the current account: editacc
(Written by Lim Zi Yang)
You can edit the name of the current account you are on using this command.
Format: editacc n/NAME
![]() Example:
Example:
-
editacc n/Bob's Bakery: Replaces the name of the current account,Default Account 1toBob's Bakery(Figure 5.3-3)
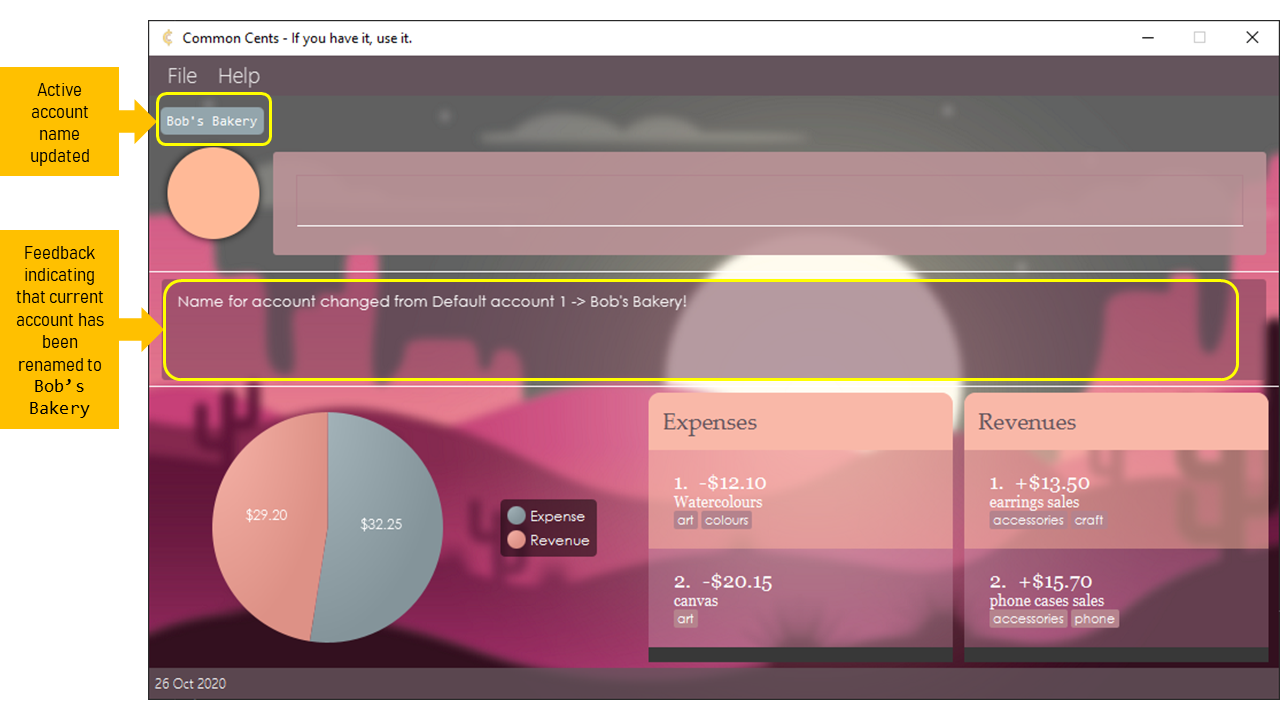
Figure 5.3-3: The currently active account, "Default Account 1", is renamed to "Bob's Bakery"
![]() Note:
Note:
- You can only edit the account name of the account you are currently on. To edit the name
of another account, you can use
switchaccto switch to the other account and edit the name from there. - You cannot edit the account name to a name of another existing account.
5.3.4 Listing accounts you have: listacc
(Written by Lim Zi Yang)
You can check the accounts you have in the app by using this command. Each account will be numbered with an index and displayed as their names.
Format: listacc
![]() Example:
Example:
-
listacc: Shows a numbered list of the account names as a message (Figure 5.3-4)
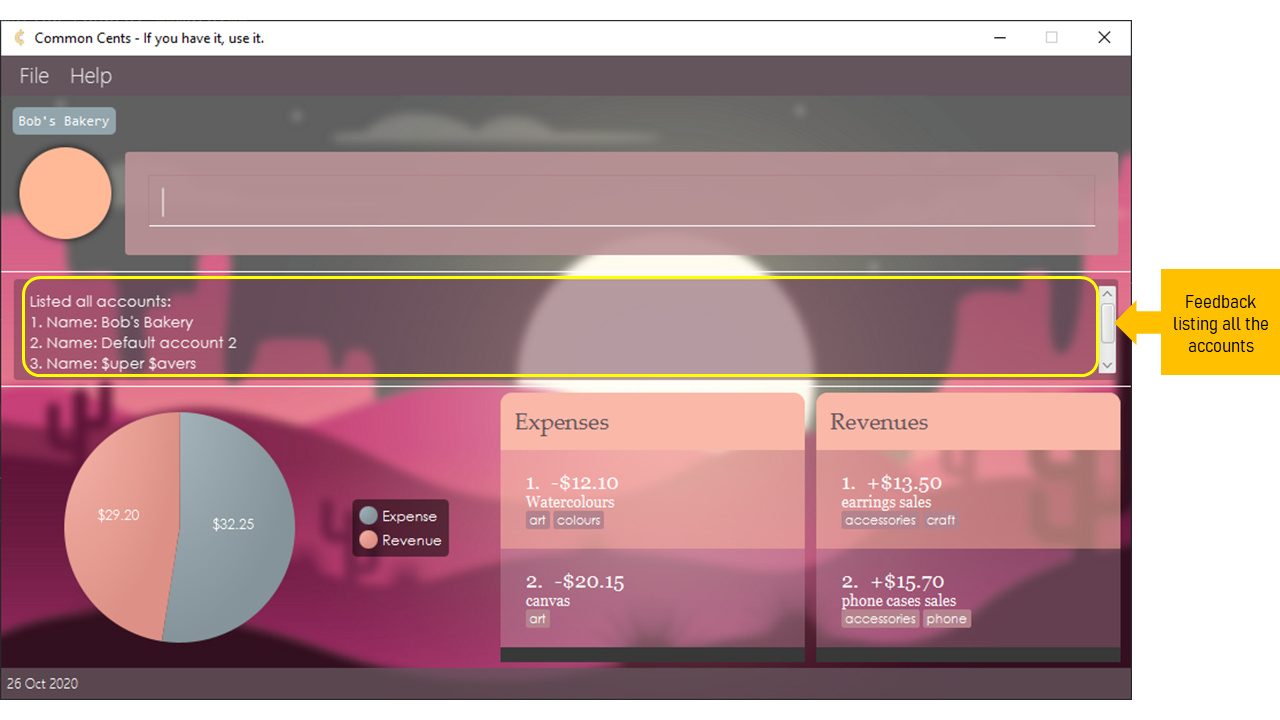
Figure 5.3-4: All the accounts are listed in the Result Display
5.3.5 Switching accounts: switchacc
(Written by Lim Zi Yang)
You can use this command to switch to the desired account. This is useful if you want to manage entries in the desired account or edit the name of the desired account.
Format: switchacc INDEX
![]() Example:
Example:
-
switchacc 2: Switches to the second account based on the list generated bylistacc(Figure 5.3-5)
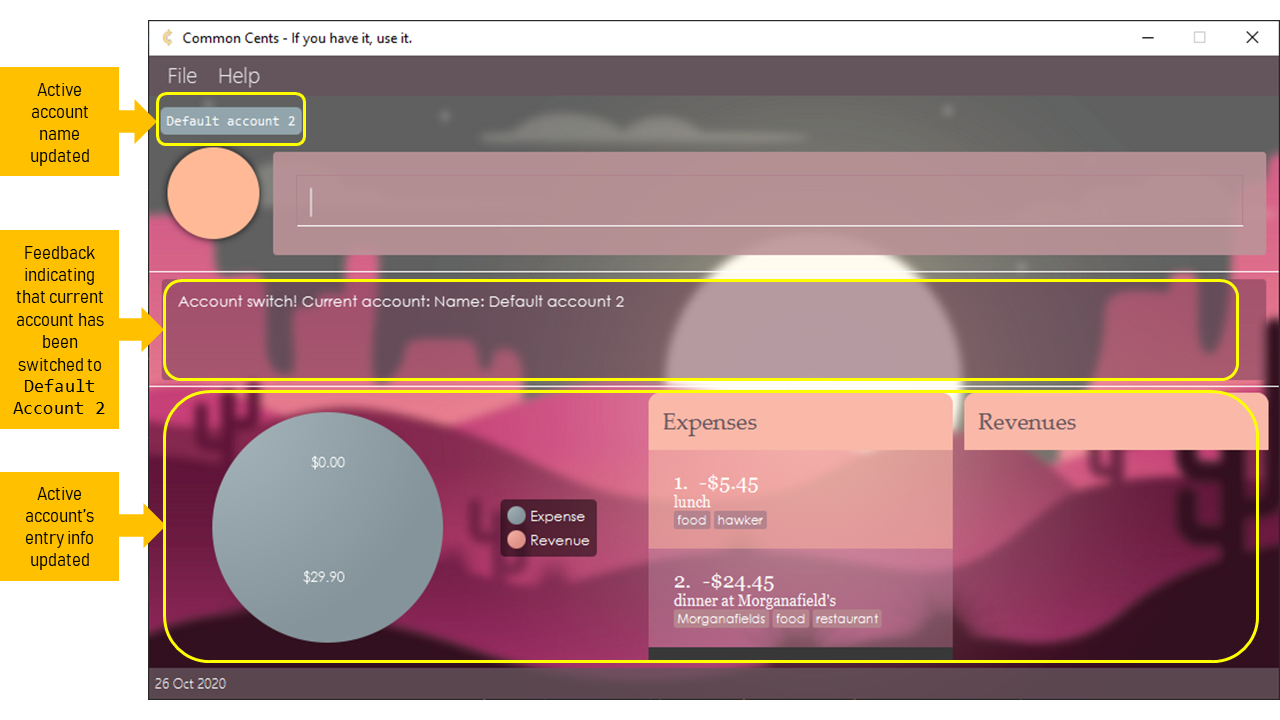
Figure 5.3-5: Current account has been switched to "Default account 2"
![]() Tip:
Tip:
If you are unsure of the account index, use listacc to check the index!
![]() Warning:
Warning:
Once you use the switchacc command, all the previous states for the undo command will
be lost. This would mean that if you choose to switch back to the account, you cannot undo the previous entry-level
commands anymore. Do confirm the changes made to the entries in the account before you switch account!
6. Frequently Asked Questions (FAQ)
This section contains a few frequently asked questions with regard to Common Cents.
6.1 General Inquiry
(Written by Nicholas Canete)
This section features general questions about Common Cents that are not specific to the features.
1. Question: How do I save my data in Common Cents?
Answer: You do not need to do anything! Your data will be automatically saved in the data folder
under the name of CommonCents.json.
2. Question: How do I transfer my data to another computer?
Answer: Install the app in the other computer and overwrite the default data file (in the data folder) with the file
(CommonCents.json) that contains the data of your previous Common Cents session.
3. Question: What if I notice something wrong with the application?
Answer: You may submit a bug report or send us a notice directly here.
6.2 Features Inquiry
This section features feature-related questions about Common Cents.
1. Question: What happens if I forget my account names?
Answer: You may use the listacc command to see a full list of your existing accounts.
2. Question: I encountered this situation when using the features as shown in the screenshot below. I understand that the
prefix indicated is wrong after checking the add section in the User Guide. However, the error message states that my category is
wrong (Figure 6.2). Can I clarify on this situation?
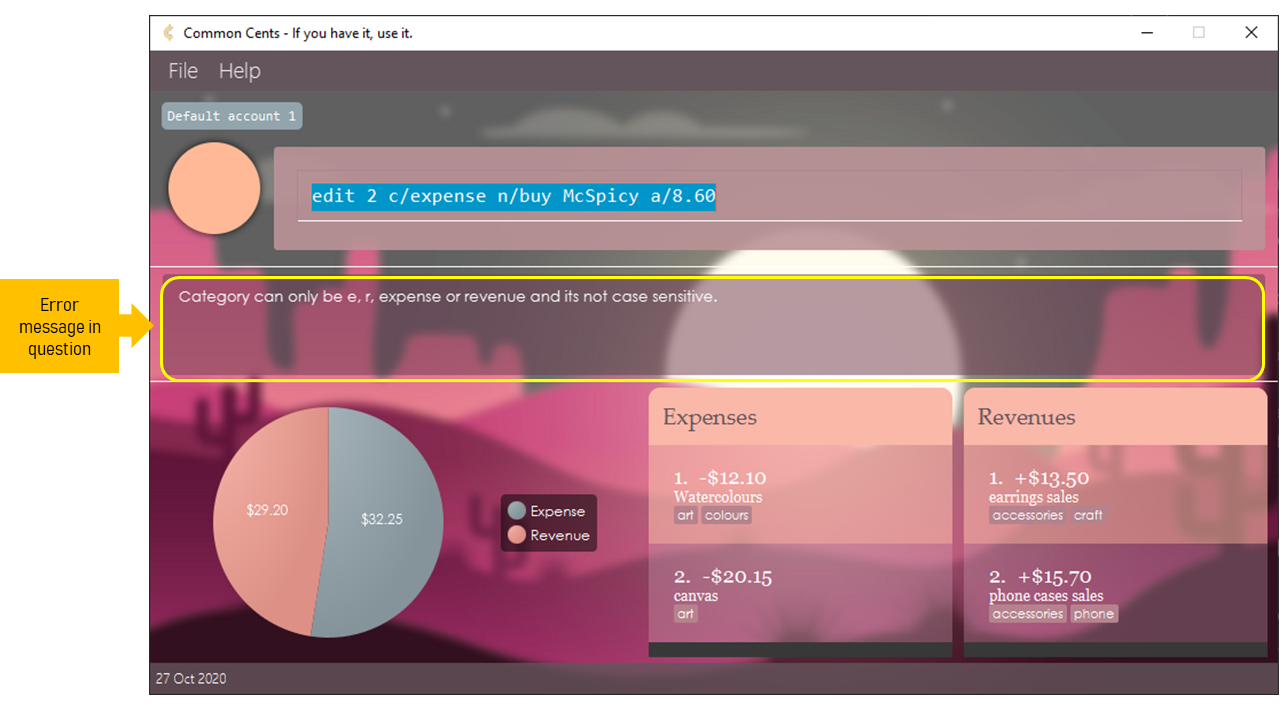
Figure 6.2: Error message that might cause confusion
Answer:
Yes, the prefix indicated is wrong as it should be d/ instead of n/. As a result, the category parameter is read as
expense n/buy McSpicy a/8.60 instead of expense. Do remember to check that the prefixes and parameters required for a command
are correct! If you are unsure of the prefixes and parameters required, do check the sections under features above!
3. Question: What if I typed in multiple prefixes with valid parameters? For instance, add c/expense c/revenue d/Buy lunch a/4.30.
Answer: Multiple instances of prefixes, as well as indexes except for tags (t/) will not be executed and an error
message will be shown. For instance, the example above has both c/expense and c/revenue, hence the command will not be executed.
Please follow the format of the commands closely in the Features section above!
——————————————————————————————————————–
7. Command Summary
(Written by Jordan Yoong)
The table below summarises the above commands in the order of appearance in this User Guide for your reference.
| Action | Format |
|---|---|
| Help | help |
| Exit | exit |
| Add | add c/CATEGORY d/DESCRIPTION a/AMOUNT [t/TAG] |
| Delete | delete INDEX c/CATEGORY |
| Edit | edit INDEX c/CATEGORY [d/DESCRIPTION] [a/AMOUNT] [t/TAG] |
| Find | find [c/CATEGORY] k/KEYWORD [MORE_KEYWORDS] |
| List | list |
| Clear | clear [c/CATEGORY] |
| Profit | profit |
| Undo | undo |
| New Account | newacc n/NAME |
| Delete Account | deleteacc INDEX |
| Edit Account Name | editacc n/NAME |
| List Account | listacc |
| Switch Account | switchacc INDEX |
8. Acknowledgement
- The project is a brown-field project, based on AddressBook-Level3 by the SE-EDU initiative.
- The background image is Designed by Freepik.